Saturday, February 23, 2013

Presidents Day


President's Day

 
Well of course we are open Presidents day...lucky us...lol. But I thought lets do something fun. I didn't feel like making a boring President but lets make the mysterious men that protect the President. They are very important to us because they keep our President alive.
So it was fun to show pictures and talk about the Secret Service Men. The kids were very interested especially when I told them they know karate. lol
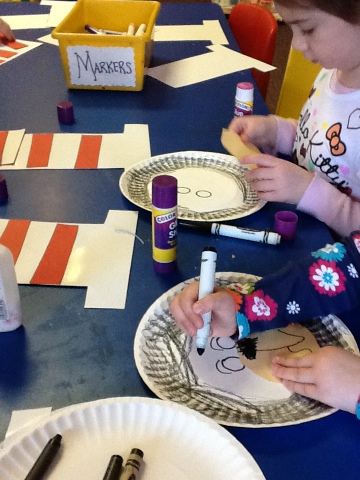
I had the head, glasses, suite and white triangle for the suite already pre cut. Easy that way.  All they did was glue all the piece one by one. Started off with the suite then the head, glasses, and the triangle. I printed out Happy Presidents Day labels so they can stick on. BAM you go yourself a Secret Service Man!


This student wanted to have the guy have a tattoo of his name on his head. lol


Happy Birthday Dr Seuss!!


Happy Birthday Dr. Seuss!!

 
Dr. Seuss's Birthday is March 2nd and what would be better than to be the Cat in the Hat! Fun and eeeeezzzzzz...lol.
First start off with a white plate, tell them to color the bumps with a black crayon. Once we got that done then I had them glue on the mouth. With a black maker they drew a nose, mouth, whiskers, and eye brows.
Once the head is done they got a white hat and glued on the red stripes. Glued the hat and stick on the plate and BAM Cat in the Hat Mask!! Fun!!!


Saturday, February 16, 2013

February Bulletin Board!!


My February Bulletin Board

 
I got the heart puzzle pieces from Oriental Trade. It is a 30 piece puzzle which was PERFECT especially when I have only 30 kids. lol Now it is hard to see in this picture but they did glitter...my one and true nightmare! It is very true that glitter is the STD of Art. It is a mess but I have to admit that it looks great! They put on heart stickers and then I put their pictures on. BAM my board!

Happy Valentines Day!!!


Happy Valentines Day Cards


We wanted to make Mom and Dad a card for Valentines Day so we made Cats and Dogs and Heart people. I had all the pieces pre cut. I know..crazy but if you do not have enough time for them to cut it all out and then glue it together the pre cut shapes are important. Once we put the animals and people together I had them on the back write Happy Valentines Day. Now I had name tags that spelled out each word. Being Pre K they do not know all the letters if you were to tell them. They are very visual at this stage so they need to see it. Once we have them put together and words on the back BAM you got yourself a Valentines Card. Now I have three classes so I switched it up, one class did the cat, one a dog, and the other heart people.


Wednesday, February 13, 2013

100 days...counting!


100 Day Count!

 
I did this activity three days before the 100 days. I made a pizza, alien, and a gumball machine. I made sure I lamentated it so I can use it every year. Now I used contact paper to lamenate due to the machine being broken so this is a way to seal it. It took a while but really a fun thing to do to set up for the 100 days. How I did this was I had them sit in a circle (Now I have three classes, I see one class a day and in each class there are 10 kids so it is small) and I discuss how 100 is a large number. Now most of the kids can not count up to that number. What I did was for each color or topping or eyes I have each kid put on 2 or 3 each. I did counting in quarters, it was easier. I would put a peice of tape on and the kids thought of it as a game to rush to get the topping or eye or candy on first. Once we got 25 on we counted each one. Now with the peices being lamenated I used a dry erase maker to mark the peice with the number. We did this four times and the kids got to count to 100 the best they can. I then BAM!!!! hung them up! So much fun!


Saturday, February 2, 2013

Snowman door

So cute to put up. Kids loooove it! I made it without kids....let just say a lot of cup and a lot of glue gun use. It took me a bit and it gets tricky but it was not too bad...real cute when it is done. Still have to glue on branches for the legs.

Tie Dye Snowmen


Groovy Snowmen

Pre K


Got love coffee filters. I think I use more coffee filters then a coffee addict! lol
Real fun to do kids love it and I love tie dye so it was up my alley.
So I started with the smaller size coffee filters...not the big ones you can get. The bottom of the snow man is the full coffee filter then the middle I cut off a little bit of the edge and then the head I cut off the wavy edges completely. 
Once you get the three coffee filters I had them placed on a mate, I used old manila folders (paint is gets all on the table without them). Then I had liquid water color in cups. The kids with paint brushes would color it in. It is amazing how they make it look like such great tie dye. I didn't have one student that just had one color snowman. It was great!
Once the filters dried, which I had them paint then about a hour later we went back. We glue the head middle and bottom together. Then I had precut hats, nose, scarves and buttons so they glued them on with googly eyes. I also gave them black marker to make their smiley faces, they can make a line or dots like a real snowman. BAM DONE! They look really really cool in the window....stain glass!